An instructional video on digital photography can help you get started with your camera. The tutorials can teach you about composition, the Histogram and using a tripod. Some of the best tutorials even include comments from the creator. This will allow you to feel more confident using your camera. You will be able take better pictures and save money.
Composition
Composition in photography is an important skill to develop as a photographer. You can turn a dull photo into something beautiful if you do it correctly. While composition is one the most difficult aspects in photography, many photographers still struggle with it. Fortunately, there are plenty of digital photography tutorials available that explain composition in a simple way, making the process a lot easier to understand.
Histogram
Histogram is an important tool that helps photographers determine the correct exposure. It prevents details from being lost in too bright or dark lighting. It is also useful to photographers taking a series of photos in a certain setting.
Auto mode
For beginners, it's a good idea to learn how to use the Auto Mode on your camera. You can tell the camera what settings you would like to use and it will let you focus on taking the best shot possible without worrying too much about the details. However, you should keep in mind that there are some things you should still think about, such as focal length and composition. There is much art and skill involved in photography. Your camera should allow you to adjust the settings to achieve desired effects.
Use a tripod
A tripod is an important tool for digital photography. It prevents camera movement when taking a photo. It is especially useful for long exposures and when using a lens with an extreme focal length. Tripods also help reduce camera shake, which can lead to blurry images. They are also helpful for photographers to frame images with precision and care.
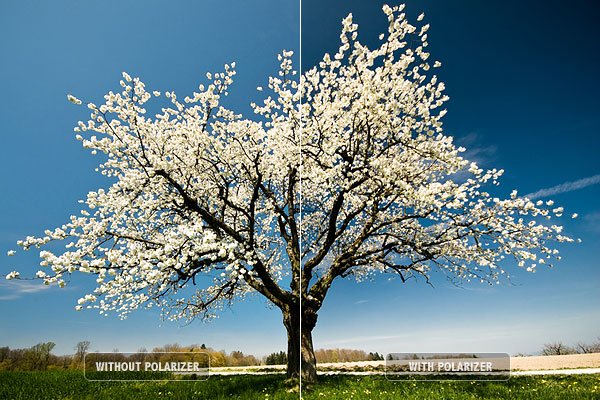
Use a colour filter
A colour filter can make a big difference to your digital photos. These filters enhance the contrast between colours. These filters make images more vivid and dramatic. However, these filters can have a negative impact on the quality of your photos so make sure to keep them clean and safe.
A colour filter can be used with a hood
It is important to know how to apply a colour filter to your camera if you are considering adding one. Colour filters can make your shots look more vibrant, but they also reduce the effectiveness of your photodiodes, which means that certain colours will appear less vibrant. Digital photography can correct this issue either with the software or in the camera.
FAQ
How can I improve my smartphone's photography skills?
You don't need expensive equipment to take great photos! Amazing images are possible with just a smartphone.
Just need to learn the basics of how to use it all.
There are many apps available for both Android and iOS devices that make it easy to edit and share your pictures.
Here are five tips that will help you start taking better photographs.
-
Set Up Your Camera App. Your device should already have your camera app installed. You can download the camera app from Google Play and Apple's App store.
-
Use effects and filters. You can alter the appearance and feel of your photo using filters and effects.
-
Adjust Exposure. You can adjust the exposure to control the brightness of your photo.
-
Use the Right Lighting It is easier to see details when you shoot in bright light. If you shoot in low light, it is possible to capture shadows or highlights in your photo.
-
Photograph People. Photographing people can show others what you are most passionate about.
You can learn more about how to capture better photos by checking out our article, 5 Tips To Improve Your Photography Skills on a Smartphone
Which is the best camera to use for beginners?
The best camera to use for beginners is dependent on your needs, budget, and skill level.
If you are looking to save money, then a point and shoot digital camera might be the best option. These cameras are not very versatile but offer excellent quality.
A DSLR (Digital Single Lens Reflex) camera has interchangeable lenses that let you shoot different types of shots. These cameras are generally more expensive that point-and clicks, but provide greater flexibility.
For those new to photography, a beginner's kit is a great place to start. Everything you need, including a flash, tripod, memory card and camera body, will be included in the one-pack.
Also, don't forget about extra batteries!
What Camera Should I Get?
That all depends on what kind of photographer you want to become. If you are just starting out, a basic point-and shoot camera is all you will need.
Once you have mastered the basics you will likely need something more advanced. Personal preference is the only way to decide.
These are some important things to think about before you purchase a new camera.
-
Features: What features do I need? Do you intend to use manual or autofocus settings? How many megapixels is your camera capable of? Is there a lookfinder?
-
Price: What amount are you willing spend on your camera? Are you going to buy a new camera every year?
-
Brand: Is it possible to be happy with your brand choice? There is no reason to settle for less than the very best.
-
Functionality: Can you use your camera in low light situations? Can you take high resolution photos?
-
Image Quality: How clear, sharp, and crisp are your images.
-
Battery Life: How long will your camera last between charges?
-
Accessories: Are you able to attach additional lenses or flashes? ?
Light Room can enhance your photos.
You can get great photos if you start early. It's always better to take as many shots as possible and then pick the ones that will give you the most bang for your buck.
Lightroom allows this because it lets you see the effects of different settings on each photo. These settings can be adjusted on the fly without having to go back into Photoshop. This allows you quick experimentation to see what looks best and what doesn’t.
What is rule of thirds for photography?
The rule-of-thirds is a simple way to create interesting compositions using no complicated camera settings. It divides your photo into nine equal parts horizontally as well vertically. This divides your image into three areas that you would like to see your subject. These are the top third (the upper left corner), middle third (center), and bottom third (lower right). These areas can serve as guides to help you position your subject within your frame.
The rule to thirds allows you to avoid placing important elements too closely together or too far apart. If they are too close to each other, it may be difficult for them to make a strong visual impression. If they are placed too far apart, it can cause them to lose focus.
What makes a good camera bag?
It is essential to choose a camera bag that protects your gear when you travel. Consider these factors when selecting a bag.
-
You should choose a large bag that can hold your accessories and camera comfortably. You shouldn't buy more than what you actually need.
-
Durability: Buy bags made of durable materials like canvas, nylon or leather. Avoid fabric and plastic bags.
-
Protection: Make certain your bag is protected against dirt, dust, moisture, and scratches
-
Organization: Consider organizing your gear by type to easily access your needs. You can put your lenses in one place, your memory cards and your battery charger another.
-
Comfort: Use a shoulder strap to carry your camera instead of a bag. Look for comfortable designs with padded straps.
-
Price: You can shop around to find a great price. Discounts are sometimes offered by some brands, which can be a bonus.
-
Warranty: Find out whether the company offers a warranty. This will ensure that you are able to contact the right person if something happens to your bag.
Statistics
- In this case, 100% of readers who voted found the article helpful, earning it our reader-approved status. (wikihow.com)
- The second easiest way to get blurry photos 100% of the time is to use a cheap filter on the front of your lens. (photographylife.com)
- While I cannot prove that all of those spots were not sensor dust, the photo was taken during a heavy snowstorm…so I guess that 99.8% of the spots are snowflakes. (bhphotovideo.com)
- Get 40% off Adobe Creative Cloud(opens in new tab) (creativebloq.com)
External Links
How To
How to use Lightroom in Photography
Adobe Lightroom is an excellent tool for photographers who need to quickly edit their photos. It allows you upload your images to one place that can be viewed as well as edited, cropped, liten, and saved. They can be shared online, printed, or emailed.
Lightroom provides editing tools such cropping and adjusting brightness, contrast and color balance. Lightroom also has a collection of presets that makes it easy to apply common effects, such as vignette (lens distortion correction) and black &white conversion. The best thing is that these adjustments can be applied automatically after you export your image.
Adobe Bridge allows you to access Lightroom. This lets you view thumbnails and organize your files while browsing through your collection. You can even add keywords and phrases to your images so that you can find them later.
Lightroom's free trial version is a good choice if you're just getting started. This gives you all the basic features. If you decide you want to upgrade, there are two options: buy the full version outright or get a subscription.
Lightroom can downloaded in many ways. One option is to purchase the software directly from Adobe. Another way is to download the trial version and convert it to a paid license. Here's how you can do it.
-
Download the Lightroom Trial Version
-
Start the program, and then click "Convert To License" at bottom of the window.
-
Enter your payment information and select the type license you wish (permanent, one year)
-
To finish the process, click on "Continue".
-
Once you have converted the trial version to a paid license, you can continue using it until the end of the term.